Showing posts with label pioneer woman. Show all posts

Monday, December 31, 2012

Layered Jello Shots, Virgin Shots


  So these are amazing, and even two weeks later I am still sort of slurping them down.  I loved jello as a kid, and Pork Chop loves the idea of it. He is always lets make jello, he used to say jelly, which was way cuter.  Anyway he likes the idea of it, but eating it, not so much.  Anyway, I saw this on Pioneer Woman, she called then jello fingers which was kind of gross, so I changed that.  And I had to adjust the recipe a tiny bit for me but other than that this is it!  I made it virgin, because I could not bring boozy jello to work, or feed it to Pork Chop, but the idea is there.

  Basically you can tailor the flavor and colour to be what ever you want.  Like I love cherry limeade, and those two colours just happen to be perfect for Christmas.  But say you want to do a rainbow, you go right ahead.  Or as this could be made boozy, you could do whatever.  Basically do what you want, but just make it; okay?

This is all you need, and some water.  And if you are making it boozy, I love you, and you need booze.

Layered Jello Shots
Found on Pioneer Woman

-5-6 boxes of jello powder in flavour and colour of your choice
-10 envelopes of unflavored gelatin
-2 cans sweetened condensed milk ( the ones in the states are larger, but I used the ones we have here and it worked fine)
-9x13 cake pan
-cooking spray
-boiling water, lots of it ( if you are doing boozy shots, which I cannot believe you would not want to, add booze, lots of it.)

So basically that is what I used, I think that if you were to replace part of the water with vodka or something it would be awesome, so I will mention that as I go along.

This is my third layer, you can sort of see how the colours mixed, and when I cut it the layers were a bit mixed, but as I went along it got crisper as I let the layers set a bit longer.

Start by boiling lots of water, I just used my plug in kettle and topped it up between layers.  Spray your cake pan with cooking spray to make sure the jello won't stick.  Also check the fridge, I found out my shelf was not level so I had to end up putting a thick layer of paper towel to try and level it off to get even layers, it didn't work perfectly as I didn't do that for all the layers.  Whatever it was still good.


 So you need a few hours for this, I was sick so did a layer, sat and watched TV then did another.  I found that in my fridge 20 minutes between layers was perfect. You need them set enough so that when you pour on the next layer it doesn't melt the one beneath it.

The layers are as follows from bottom to top, so follow this:
-jello red
-white layer
-jello green
-white layer
-jello red
-white layer
-jello green
-white layer
-jello red
-white layer

 After that I ran out of room. So do what you want, but that is how it worked for me.

For each jello layer follow this:

-melt one packet of unflavored gelatin in 1/4 cup of cold water.  (this is where you would use Vodka instead of water, so 1/4 cup vodka)  Stir. Once fully dissolved pour in one cup of boiling water and right away add in one packet of regular jello, stir really well, but not fast, you don't want bubbles.  Stir until all the jello is gone, and then stir some more, if you get crystals you will get a ruined jello.  So once it is all ready, pour it into your pan and set it in the fridge to set for about 20 minutes.

This is the last layer, it was a heavy pan I tell you!
 You can start making the white layer as it will cover about 3 layers in one batch, it will sit out and not set up so you can take your time.  Start with your can of milk in a bowl, then take another bowl and put two envelopes of unflavored gelatin in with 1/2 cup cold water.  (if you are making the boozy version, don't bother to change this out for vodka, trust me you will have enough in the other layers) Once the gelatin is dissolved take a cup of boiling water and pour that over the milk and stir until well mixed.  Then add the gelatin mix, and add another 1/2 cup boiling water and mix all together.  This will be the white layers.

To make sure the layers are set enough, take your pan out and tilt it, the jello should not move at all.  Once you have that, slowly pour enough of the white mixture over to cover it well and chill it again for 20 minutes or until well set.

That is it!  You continue on with that making it as high as you want.  I found that I ended up just making the last layer a double layer of white as I had lots left but not enough room to do another layer of colour in between.

 Once that is done, let the whole thing set for at least 2 hours and then you can cut it how ever you would like.  I thought it would be fun to try it with a wavy cutter, I was wrong, it was way better just in squares or simple shapes.  Also this pan of jello is heavy, so if you can just leave the pan in the fridge and pour the layers on, that would be great, trust me I did that the last few layers.

This is how it turned out when I used a wavy cutter, I didn't like it that much.

 So this is super yummy, and a great option to regular jello shots as you don't need cups, just pick it up with your fingers and eat.  Which is probably the best way to do it when you are drunk, you know, less waste and less chance of breaking cups.  I am smart that way, and this would be perfect for a new years party.  If you make the boozy version please let me know how many shots you got in before you passed out, I don't know if I am brave enough to try this!
HungryLittleGirl
The DIY Dreamer
href="http://ourdelightfulhome.blogspot.com" target="_blank"><img alt="Our Delightful Home" src=" http://i1170.photobucket.com/albums/r525/ourdelightfulhome/odhbutton1.jpg "/>
Love Bakes Good Cakes
Back for Seconds
Adorned From Above

Thursday, May 24, 2012

Iced Coffee, Pioneer Woman Style


This is the jug I keep in the fridge to just use as I like, it is nice and thin so it doesn't take up too much space.  It also was the last one in the store and it was missing the lid, so I got a discount and used one I had.
  So I never ever liked coffee.  It's just something I couldn't get into.  I sort of dislike all hot drinks, I mean sure I would drink a hot chocolate now and then, but I didn't really enjoy it.  I tried to get into tea, I mean I bought a butt load of it and even got a tea press in Disney.  But to no avail, I could not drink the hot stuff.  I sort of get this flushed sick feeling drinking hot things, so I must be weird or something.  I blame my parents, who else can I blame really?

  Then one day it all changed. Sort of.

  Hubby and I had taken Pork Chop to the Beach ( or is it Beaches now? Darn Toronto changes things so much)  Anyway we were there and it was getting late and Hubby was so tired, I said I would drive the 40 minutes or so home but I needed some caffeine.  Now I had to give up any sort of pop before my gastric bypass and to this day I still do not drink it, so I gave in and went into Starbucks.  I asked for something with coffee, no sugar and lots of caffeine, oh and it had to be cold and not carbonated.  The sweet lady suggested an iced coffee.  And I was hooked ever since.  Ask Hubby,  now both Pork Chop and I beg to go to Tim Horton's.  Pork Chop could eat his weight in chocolate Tim bits, which I guess should make me mad since he won't eat my baking usually.  Anyway, I was addicted.
This is all you need, notice the blue card Pork Chop made for Hubby.  There was nothing for me, but you know he still likes me right?

  So this was in the fall, and I was loving it and thinking of ways to make it cheaper at home.  I bought instant coffee and it was gross, I tried the cappuccino powder that you just add water to,and it was gross.  I was paying a lot for my Tim's addiction.  So I did what every other sane woman does, I googled it.  And I came across this!  I knew it was fate. Pioneer woman has some great stuff, trust me.

I just use the whole can of coffee at one time, this is a 4 quart container I think, and I got it just for my coffee.
  At this time it was about to be the holidays, and Hubby was all ready to get me something amazing and I was cutting off every idea he had.  He even went so far as to send me all these links to single serve coffee makers that made iced coffee.  But they were the pod ones and I hated the idea of having to buy the pods. I had been looking for a cheap brewing coffee pot, as we had given ours away as we had only used it once in our marriage up to that point.  Hubby even picked one out, and as with all things I told him no, I had better plans!  Because I always have to ruin his fun.
I think this looks so gross, but figured my post would not be complete without it; and the back ground of my super messy counter.
 So I read what Rea had written, went out and got a large container that I could use just for this, one for my fridge to keep my stuff in and a can of Tim Horton's coffee.  I got home and set to work, I even weighed out my coffee like Rea, as she uses good stuff and I just got what I knew.
So this sits on my counter for 24 hours, in that time the tutor was in my home.  Wonder what he thought it was.
  So I panicked because she said to let it set for at least 8 hours, which to me meant 8 hours only.  And I work and don't have time to time this stuff.  So I did what I could, mixed it up before bed and the next day after work strained it out.  Now I am not sure if it was done too long or what, but I found the taste different than the one at the store.  I need an insider to tell me how they do it! 
Another shot of my messy counter, but this is how I do it, a large strainer and a bowl.

I line the strainer with paper towel, I end up having to switch it out twice while I strain it all.
  Anyway, after some fiddling I found if I added some water to it then the ice and cream and sweetener it would be perfect!  So there you go, I had it all set. I find now that I use the whole can in the 4 quart bin filled with cold water.  Then I leave it, for about 24 hours.  While I strain it I add about 50-75% more water and it is almost perfect!
I know, gross if you don't know what it is.

I put it in a measuring cup then add about 50-75% more water then put it into the container. 
 I still admit to hitting Tim Horton's when we are out and about, and I have to be very clear that they not add any flavor syrup, that stuff causes me to get very sick and have "issues" if you know what I mean.  If you don't then google "affects of sugar alcohols on bowels"  and then just imagine it way worse because I have had gastric by pass.  The people at Tim's give you the look when you ask like 5 times if they put the syrup in, but a few times they have and I have not realized until I have taken a good long drink, then spent the next hour or so in pain.
Way cheaper than Tim's, but not as convenient when you are not home, if you know what I mean. And I just realized there is a Mcdonalds iced coffee in this picture too.  I had to have something to drink while I made my own.
  So there you have it, how I am amazing, became addicted to iced coffee ( which I am not supposed to have too much caffeine after my bypass, bad bad me) and managed to ruin Hubbies Christmas gift idea, again, and saved some money.  I know, it's amazing right?  And now I will get back to what I know, baking and sugar and stuff.
Photobucket Somewhat Simple I'm Lovin' It at TidyMom

Monday, May 14, 2012

Snicker Doodle Muffins


From this angle they look like cookies.


  Today I am going to share with you guys one of Hubby's favorite things I make. And by favorite, I mean he actually eats them.  The first time I made these muffins he ate almost all of them, then I think I made them for him almost every week or so until he had to tell me to stop.  I mean come on, if he is actually eating something I make how can I not get excited right?  Well I have not made these in a long while, and I was looking for something quick to make to blog about and this is when I had the brilliant idea to make them again.


  I first saw these on the Pioneer Woman blog.  I knew the moment I saw them Hubby would love them, I mean I say that about a few things, but this one, this was different.  Or at least I hoped it would be.  And for once I was right, but don't let him know that.

  So this is a nice easy recipe that gives you a nice moist dense muffin, covered in a layer of cinnamon sugar. What is not to love right?  So I have not made any changes, other than I don't buy butter milk, and make my own, it is all the same.

  To make your own butter milk you just put some vinegar in with your milk and let it set for about 5 minutes.  I will let you know the amount in the recipe.

All ready to go.


 Snicker Doodle Muffins
Via Pioneer Woman Cooks
By Two Peas in Their Pod
Originally from Culinary Concoctions from Peabody

(wow that is a lot of recipe info)

-1 cup butter
-1 cup sugar
-2 eggs
-2 TSP vanilla extract
-2 1/4 cups flour
-3/4 TSP baking soda
-3/4 TSP baking powder
-3/4 TSP cream of tartar
-1/2 TSP salt
-1 cup sour cream
-1/4 cup butter milk*

*instead of real butter milk just put a splash of white vinegar into a measuring cup then fill the rest of the way to 1/4 cup with milk, stir and let stand for 5 minutes.  If you leave it a bit longer and the milk gets chunky, don't worry it is still fine.  I let mine sit for over 10 minutes and it still turned out fine.

  Pre heat oven to 350. Cream the butter and sugar until fluffy, add the vanilla and one egg at a time and mix fully.  Sift all the dry ingredients together and add half to the mix, then add the sour cream, mix, then the rest of the dry ingredients.  Then mix in the butter milk.


As the first batch was baking I rolled the second batch and put them in liners to wait.


Topping

-2/3 cups sugar
-2 TBSP Cinnamon

  Mix the topping and then take a scoop of muffin mix and roll it in topping.  Then place muffin in muffin liner.  These are very soft muffins so you need a liner.  Once all the muffins are rolled top them all with the left over topping and bake for about 18 minutes, until a toothpick put into the middle comes out clean.


So good!  I could eat these everyday!
  These are some of the tastiest muffins, so good, even a day or so later, if they last.  The batter is nice and thick, so once you scoop it out into the bowl of topping it is easy to handle.  Hubby ate a whole bunch and is a little upset they are running out.  But I will make them again, I promise.

I'm Linking up Here


  Skip To My Lou KitchenFun Lil\'Luna
The DIY Dreamer

Thursday, January 26, 2012

Pioneer Woman Cinnamon Scones

                       Hi all, don't forget to enter my giveaway for a super cute cupcake charm! here
Yum on a plate!
  Have you ever heard that you should not always believe what you read on the Internet?  Well you shouldn't.  Unless it has to do with food, and how good something is.  Like when I read about Panera on a blog.  The blogger said it was amazing and that everyone should try it.  Well at the time we did not have that place here in Canada.  Then one day we did.  So I remembered and tried it.

  I have to tell you right now, the Internet was right, this place is awesome!!!  I tried a few things, and since I cannot eat bread, I got a scone.  A cinnamon scone.  It was love at first bite.  And I may have cried a little inside when I realized I had only bought one.  
See how modern I am?  I use the "Internet" I know, I'm also a dork.
  Then I saw a recipe on Pioneer woman.  It was fate I tell you!  She had a recipe for cinnamon scones, and I was sold.  And it only took me like a year to finally try them out.  I am so sorry I waited so long, my pants aren't, but I am.


  So I made them thinking I would take them to work and share.  Then I ate one, and promptly hoarded them and decided to tell people at work I had not baked at all.  They are none the wiser I think.  Unless they took note of the tight pants I am wearing now.  

  So this was really easy, a little scary since I have not made scones before, but you know, it all worked out.

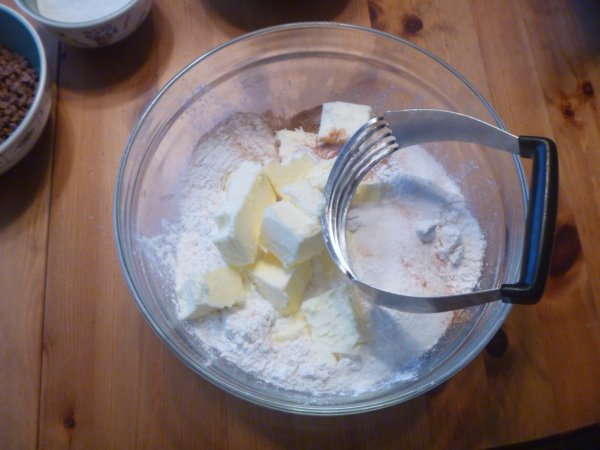
I used cold butter, the recipe did not specify, and I know you use cold butter for pie crust.  It seemed to work.

I got this pastry thingy, a pastry cutter I think, in college.  Because when you are in culinary school you have every excuse to buy whatever kitchen gadget you want.  Even if you only use them once.  But see I kept mine, I knew it would come in handy!

Cinnamon Scones
From Pioneer Woman

Pre heat oven to 350

-3 cups all purpose flour
-1/3 cup sugar
-5 TSPs baking powder
-1/2 TSP cinnamon
-1 cup unsalted butter
-3/4 cups heavy cream
-1 egg
-1 TSP vanilla
-1 cup cinnamon chips ( I used the mini ones)

Topping
-1/2 cup sugar
-1 TSP cinnamon
1 1/2 TSPs heavy cream


In a large bowl sift all dry ingredients together.  Cut up your butter, I used cold because I was not sure what to do.  Then use a pastry cutter to cut the butter into the dry stuff, until it is all crumbly.  Add your cinnamon chips.


This is after the butter is cut in, I forgot to take a picture without the cinnamon chips.
  Using a fork, mix all your wet ingredients together then mix into the dry with the fork.  Do not over work, just mix until it all comes together.
Right about here I panicked, how is that little bit of wet stuff going to bring this all together?

Turn the mixture out onto a floured surface, or parchment like I did, and mix it together a bit to get all the dry bits to come together.  
Shape the dough however you want, a circle, a square, whatever.  And pat it flat.  

See it worked!  I had to sort of mush it together on the table a bit as there was a few really dry patches.

OMG!

Mix the topping and spread it over the top of the scones and pat it down.
Cut your scones with a knife or pizza cutter to the shape and size you want.

I wanted to make them small, so I could control my portions.  Yeah it was worth a shot, I just ate like 3 instead of one.

Don't even try to pick them up, use a cookie spatula or something, just to save yourself the frustration.

Use a spatula to transfer the scones to a lined baking sheet and bake for about 14 minutes.  
I figured they were done when I pushed on the sides and they were not soft.

See, all done, and they could be considered healthy, they are a breakfast item after all. I can try right?
  People, these are so good, they are sweet like a muffin but have the heaviness of a scone.  I cannot eat bread because of how doughy it gets when you eat it, so this is perfect for me.  I made them really tiny so I can eat a few, and like I said I had planned to share them.  Plans do not always work out people, trust me.  And that is something you can believe on the Internet!


HookingupwithHoH


Somewhat Simple


I'm Lovin' It at TidyMom